Wednesday, December 14, 2022

Drawing with Beads

Art has been created throughout time.  Which means that artists have lived in different times, come from different countries, cities and cultures around the world.  

Let's look at some colorful beaded art by Indigenous artists of the Pacific Northwest.  

First, what does Indigenous mean?

Indigenous people are the first people to live in a place.

Even though there are many groups in this area, the specific artists we will become familiar with today are the Plateau Indians of the Northwest.  


Think of states like Washington, Oregon, Idaho and parts of Canada.


What does it mean to trade?  300 years ago (in the 1700's) the fur trade expanded to bring new trade goods to the Northwest region.  Native people of the Great Plains brought their beadwork to the Northwest.


Seed beads (small round beads) in many colors became available, together with steel needles. 


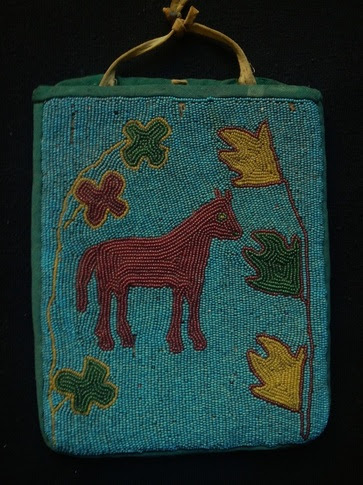
Because of these newly traded materials beadwork was now being created. Beadwork featured flower shapes, images of people, animals and landscapes.  Today more contemporary designs are created.

People of the Columbia Plateau traditionally relied on salmon, roots and local animals. 

What do you see that tells you scenes of hunting for food in daily life show up in their beaded work.

Historically women created the beaded work.  Often girls learned to bead from an older relative or other elder.


Native plants are popular in Plateau design although inspiration comes from many sources.  Some designs are passed down in families. What is something your family has passed down?

 Beads are sewn over the surface of the bag.

 The main design is beaded first and then the background is beaded around it.

Beaded bags are usually made from cloth and beaded on one side only. 

Remember flower designs were popular.  


Which specific plants and animals do you recognize?

Notice the flowers and horses.  The horse was a favorite motif at the time.

Flat beaded bags are still produced today. 

People make them to carry at celebrations, ceremonies and social gatherings, to give to others, to trade and sometimes to sell.


Will you work with beads in our jewelry studio?

Will you include motifs in your art that you notice in our Missouri environment?  Trees, flowers, animals?

Will you create functional art that can be used by you or someone you know?

Perler Beads will be out for the next couple of art classes.  You can use small beads of color to create artworks.


https://mnch.uoregon.edu/collections-galleries/plains-and-plateau-beadwork


Glazing in the Clay Studio


Glaze --leveling up your ceramics


Let's GLAZE!

When you have created a clay artwork you will come in next class and it will either be in the kiln, still drying or bisqued.  
look at the three stages of clay we see on the cart.


Glazing can really Power Up your work.  
The color can enhance the shape of your pottery.  You can add patterns, solid areas of color and design.

Betty Woodman was a ceramic artist.  She was known for inventive forms and how she applied her colorful glaze.  
Widewalls
Betty made FUNCTIONAL pottery and later on more decorative work.  
That means it had a function, purpose or could be used to perform a job. 
Functional meaning it could be use to drink from, hold objects, 
pour and eat off of.  Will your pottery be decorative or Functional?  
if you are going to put food or liquid in your clay artwork you will need to listen closely to instructions about GLAZE.


Glaze is the color we will use for clay.  Glazed pottery goes back in 
the Kiln for a second firing.  The glaze becomes molten hot and 
coats your work in a thin layer of glass.
The Cabinet of Glaze is to the left of the Clay Studio.


You will only remove a blue tray of glaze from this cabinet and nothing else.


Select a blue tray of glaze and bring it back to your table.  No placemat


You will need a brush for each color you use.  New color new brush. Each jar gets 
its own brush
NO glaze the bottom of your work. if you get a little drop wipe off with a sponge.


Two coats.  Same color, same place, twice.  
These glazes are not meant to be mixed.  No mixing colors.
TWIST Caps back in place.  

Rinse Brushes until water runs clear.
Return Glazes.  

Put your glazed work on the cart.  Next class you will pick up your finished ceramics.


Ceramic work goes in the kiln a 2nd firing and the glaze becomes molten and melts onto your 

pottery and creates a shiny coating.


Clay Studio is Open


Clay Studio is Open

 Meramec Clay Studio is OPEN


Clay Studio


Bring supplies back to your assigned seat

Pinch Pot


Slip and Score

Think of SLIP like your CLAY GLUE


Drying your clay.  Once your clay is dry you will not be able to attach more clay


Clean Up
Return Materials
Clay in the lidded box
Wipe table with a green cloth


*Touching art from of another clay artist may end your time in the clay studio

*Artists who use clay responsibly get to use the Clay Studio.

Opening the Clay Studio 2022


Opening the Clay Studio

 Welcome to the Clay Studio


Today you will learn about the Clay Studio! We will go over expectations for Set up, Clean up and Studio Time.


What is Clay

Clay is a type of fine-grained natural soil material containing clay minerals. Clays become soft when wet but becomes brittle when dry and hard after firing.  It's an art material that comes from the EARTH.

Let's look at how artists work with Clay and learn some Ceramic hand building techniques and process.  When you work with clay using your hands it is called Hand Building.  


Slab


Roll out clay and cut into shapes.  You can cut a Slab.  Make marks and texture into the surface.  And press and shape the slab into a form.


Use a mold to create a form

Don't make the slab too thin or too thick


Here are a few more examples of SLAB projects


Coil

a long pliable cylinder/roll of clay.


You can get very creative with the way you roll coils into arches, spirals, donuts, twists and braids.  You can cut coils into long and short lengths and place the horizontally and vertically.


Coils can be simple or intricate

Some artists like the coils to be visible or be part of their design.  Other artists like to smooth away out the coil texture.


Pinch Pot

Pinching is a basic pottery technique, Making a pinch-pot is pressing the thumb into a ball of clay, and drawing the clay out into a pot by repeatedly squeezing and pressing the clay between the thumb and fingers


How about Attaching feet or a handle.  Make a lid


Turn that pinch pot upside down--think of the possibilities!

What if you add coils and texture to your pinch pot 
 

Slip and Score

Don't SKIP THE SLIP


Could you combine a COIL, PINCH POT and a SLAB?

Think of SLIP like your CLAY GLUE


Do you notice a clay coil attached to a pinch pot?


Texture

Using tools and materials to press markings into the clay surface.


Drying

clay must dry and be fired to become hard and waterproof.  Once fired, water will not soften the clay.

Firing 

a KILN is an oven for baking/ firing pottery.  It gets hotter than your oven at home.


Things BREAK!   


If your clay is too thin or too thick it can break.  Slip and Score to make sure attachments stay in place.  

Accidents can happen...but lessen the chance of accidents by paying attention and not playing around.

Glazing


Adding color to your fired clay often includes glaze although other materials can be used.  Glaze can can be used to color, decorate or waterproof an item.  


You will apply glaze like paint.  Brush on 2 coats.  Same color, same place, twice. 


NO glaze the bottom of your work.  if you get a little drop wipe off with a sponge.


Before and after the second firing in the kiln

Often Glaze will make your work shiny.


Giving your Ceramic art a little EXTRA!

plan ahead for holes to hang your work with a wire or add beads.


Meramec Clay Studio